2022-10-20
# Principles and Methods of Teaching
#education #teaching #EDUC130
# Designing Learning: Objectives and Assessments
# Designing Traditional Assessments
🖼️ STEP 2: Choose the form (Continued) - How can I “see” the learning objective? What is the most appropriate evidence that students can produce in their context?
- In the past exercise, you started to design an authentic assessment for your lesson. The question is, do you need to have an authentic assessment every day of your class?
- Answer: No. As previously emphasized, ==since tasks given in authentic assessments are complex, it usually entails using several knowledge and skills - this means that it takes some time for a learner to be able to successfully do it.==
- For example, in this class, the lesson plan is an authentic assessment which I will have you work on - but as you can see in the module, I need to ask you to do some exercises first, that will lead to the building of the skills you’ll need for your actual lesson plan.
- ==These skill-building or knowledge-testing exercises are often referred to as “traditional assessments” (because, in terms of practice, most assessments still look like this - it is only recently that teachers have become more conscious of making sure that authentic assessments are done as well).==
# Authentic v.s. Traditional Assessments
- As opposed to authentic assessments, traditional assessments are less “messy” and complex. They often have a particular right answer (or a set of right answers). This is often the case because typically, ==traditional assessments evaluate a students’ capacity to do the subset skills necessary to build towards and authentic skill.==
- For example, in a Physical Education Class, an example of a traditional assessment for basketball might be a shooting practical test - where the teacher can evaluate a player’s capacity to shoot accurately, as well as their shooting form, etc. These (accuracy, form) are necessary skills that they will need for a more authentic task (ex. playing in a 3 on 3 game).
- Although it is ideal for assessments to be authentic, ==traditional assessments still play a crucial role since they give teachers some feedback about the subset skills they want students to be able to gain== (ex. if a student cannot dribble, it will affect his/her ability to play in an actual basketball game).
- Common types of traditional assessments include:
- 📝 STANDARDIZED TESTS: These exams are taken by cohorts of students from different schools. They are often designed by an external body -ex. entrance exams, national achievement tests,etc.
- 📝🏃♂️TEACHER-MADE TESTS OR ACTIVITIES: This is the most common category - common examples are graded quizzes with various question types and exercises. Test items or tasks are often specifically designed to evaluate a students’ ability to do a particular skill or comprehend a particular concept. Tests and exercises can measure a students’ ability across Blooms Taxonomy through carefully designing the types of questions or tasks.
- Review this article on the different question types
Try to come up with a traditional assessment for your learning objective/s. It can either be an activity or a test.
- Identify the year level and subject area
- Share about your traditional assessment idea: - If you decide to come up with an activity -state the learning objective, describe the activity and explain what you will check or how you will gauge a students’ success. Ex. I will ask students to write 3 complete sentences to introduce themselves. I will check for proper capitalization. - If you decide to come up with a test - state the learning objective, give at least 2 examples of test questions (any question type) and explain how each question will help you determine what a student has learned.
# The Assessment Litmus Tests
Apart from the forms that the assessment takes and how much it aligned with your learning objectives, another key consideration in designing assessments is to ensure its validity and reliability.
# Validity
- To put it simply, validity is the extent by which the assessment will be able to tell if a student has really met the objectives/has learned what you wanted the students to learn.
- For example, asking a question in a test about something that was never discussed or touched on in class invalidates that test question! When questions or tasks are given in an assessment, it should be clear that this is something you expect for them to be able to know or do, because of what they learned. This can be a common mistake in test making because the teacher is often an expert in a subject area, and might end up asking questions based on what they know not what has actually been taught.
- Another version of this is a common mistake in coming up with authentic assessments. Have you ever been asked to post a multimedia project where the basis of your grade is the number of likes? Unless this is a class on social media marketing, this is usually an invalid way of assessing! Why? because the skill of getting people to like a post is often not connected to the actual skill being assessed in projects like this (ex. an infographic for a math class, or a video for a science class).
- One helpful litmus test in checking for assessment validity is to ask this: Can your students do this without having learned what you want them to learn? (ex. can they come up with a viral video without attending your math class?) - if the answer is yes, then you might be coming up with an invalid assessment. At the end of the day, the assessment should primarily provide evidence of your learning objectives.
# Reliability
- On the other hand, reliability is the extent by which your assessment can provide reliable results/measure what you want to measure consistently.
- For example, if you came up with a multimedia project (ex. make a video), will it favor those students who are more technologically and artistically inclined? Will that get in the way of objectively being able to tell if your students met the objectives? When you designed and gave a test across different sections, were the range of results different when compared? (In your assessment course, you will look into this more deeply - we won’t get into this too much in this course).
- One helpful litmus test in checking for assessment reliability is to ask this: Are there factors in the assessment that might disadvantage other students? How can I minimize the chances that this affects their performance?
In ensuring that your assessments are valid and reliable, you are able to ensure that the data you get from your students’ work truly give feedback about their learning - after all, that is really one of its main purposes.
# Key ideas about aligning assessments
- Ideally, assessments provide evidence not just of knowledge and skills, but of application. Authentic assessments are great ways to make sure that you provide opportunities to actually try their skills now, not just later.
- Assessments should always be anchored on objectives. What you assess and how you assess should provide evidence of your objectives being met. As a teacher, it is for you to see if students have really learned.
# Designing Learning: Instruction
# Selecting Learning Instruction
# Module 3 Overview
One of the most important factors in how interesting teachers are to their students is their use of one key behavior: instructional variety. In a study of experienced and inexperienced teachers (Emmer, Evertson, & Anderson, 1980; Emmer & Evertson, 2016; Evertson & Emmer, 2016), experienced teachers who showed flexibility and variety in their instructional strategies were found to be more interesting, easier to listen to, and more engaging than inexperienced teachers who had no knowledge of alternative teaching strategies.
Knowledge of a variety of instructional strategies and the flexibility to change them both within and among lessons are two of the greatest assets a teacher can have. It is unlikely that any other key behavior, however well executed, will have the same effect as variety and flexibility in capturing the interest and attention of your students.
(Borich, 2017)
# Park your experiences at the door
- As learners, we’ve been used to the “receiving end” of the teaching that happens. In the previous exercise, you probably had your own reasons for being able to say that those strategies/learning activities were effective.
- However, although there is something to be drawn from our experiences, ==basing “good teaching” on experience alone is not necessarily sufficient. In fact, we are often “limited” by the experiences we’ve had.==
- For example, if in the schools you’ve attended the lecture was the prevalent method of teaching, then you could bring that bias with you as a teacher - either positively (lectures are most effective) or negatively (lectures are boring and ineffective - if you haven’t experienced a lot of good lectures). This bias can then get in the way of accommodating new methods and strategies - so, we must be ==“bias conscious”.==
- Therefore, as you go through this module, I invite you to ==“park your experiences at the door”.== Leave them behind for a bit - we will draw from them when necessary, but I invite you to be open to listening to the experiences of other educators and research as we uncover a variety of teaching methods, even if sometimes they might challenge your own paradigms and perceptions.
# How people learn: Intending to ACE
- Although we will not have time to delve deeply into what it takes to learn and the science behind it, I’d like to give you a brief overview of 3 things that we know from research about what teachers can do to lead to effective learning.
- When designing learning experiences, here’s one way to make sure you ACE your design (note: although we created this video with online learning in mind, the principles are very much applicable to any modality). As you watch the video begin to think of examples of how you, as a learner, may have experienced ACE in your own classes (online or otherwise).
- Designing for Online Learning
- The short video above provides 3 brief tips about how to effectively design for learning, each of them, grounded on educational research and the learning sciences. In this course, we will treat them as ==principles or goals for our instructional activities== - that when we design instructional activities, no matter what specific strategy you will plan to use, we will keep these three instructional intentions in mind (clue: in the lesson plan format, you can use them to explain your instructional intention). Here are a few more things to expound on each of them.
- 🧍ACTIVATE FROM CONTEXT
- This first principle is grounded on one of the key findings we know about learning from Cognitive Science. That is - ==the role of prior knowledge and experience.== Tapping into a learner’s prior knowledge and experience is an effective way to lead to learning because from a neuroscience perspective, what you are actually doing here as a teacher is ==activating your learner’s neurons for you to connect to.==
- Notice how in our modules I would often begin with asking you to recall or remember a past experience? - this is the reason for it! Think about it. Imagine explaining something new to someone - it will often be easier for them to understand if you begin not with the new information, but with ==what they already know or have experienced. ==This is also why sometimes memes or pop culture references work when included in the teaching process.
- Think about the topic you have in mind for your lesson plan. What can you activate from your learners’ context?
- 🐙 CONNECT TO CONTENT
- This second principle is, again, grounded on another key idea from Cognitive Science - that is, that ==the process of learning is “active” not “passive”.== Sitting through the lecture and listening, without actively thinking about what you’re hearing doesn’t immediately contribute to learning! It’s not like teachers pour knowledge onto a student’s head! (This analogy about teaching is a common misconception). The actual “learning” happening in your students’ head is ==an active process of a learner “processing” the stimulus presented and allowing that to modify their perception or actions.==
- This means that another instructional intention, if we are to teach effectively, is to make sure that you ==create opportunities not just to present content but for students to connect to it.== This is why teachers who ask a lot of ==good questions== really get students to learn.
- E.G. I remember Philo classes with Dr. Calasanz - he would ask very simple questions like “Paano kung walang Diyos?”, and get us to really grapple with it, even after the class period.
- Think about the topic you have in mind for your lesson plan. What can you ask students to do or think about that can get them to actively connect, and not just passively absorb your lesson?
- 🏁 EVALUATE TO VALIDATE
- Finally, this third principle is anchored on one of the findings of the learning sciences that ==“retrieval practice” is an essential part of the learning process.== This principle is very much aligned with a common saying that you might have heard before: “If you don’t use it, you’ll lose it”. What we know about effective learning is that ==the act of remembering and using something you just learned== is actually one of the most powerful ways to really solidify what you are learning.
- For example (and feel free to try this out), one of the findings from research on this area said that when you are preparing for a test, instead of reviewing and rereading your notes, ==spend more time setting it aside and trying to explain it over and over to yourself.== According to research, the latter is a more effective way to learn.
- This means that as teachers, we should design experiences not just for students to “acquire” new content or skills, but several experiences to practice and apply it as well. (Wait, isn’t this already the assessment?! - yes, you’re right, but apart from the assessment that often aims to measure what has been learned, it would help to have several opportunities to produce evidences of learning in the learning activities/in instruction, even if it is not something that will part of their grade.
- Think about the topic you have in mind for your lesson plan. What are practice activities that students can do?
- These will be the three main instructional intentions we will bring to our design of instructional activities. At the onset, you may look at them as a way to sequence your activities - starting with an activity to activate from context, then connect to content and to evaluate to validate. Yes, that’s one approach, and as you will learn in the next part of this module, very much aligned to a method called “Direct Instruction”.
- However, ==this need not be treated linearly.== Some methods might just focus on one or two of them, and that’s okay! ==What matters is your instructional intention is clear.==
# Aiming for Objectives
Apart from having clear instructional intentions, another consideration in choosing the right method or strategy is to look back at your goals or your learning objectives.
“Just as the carpenter, electrician, and plumber must select the proper tool for a specific task, you must select the proper instructional strategy for a specific learning outcome (Borich, 2017)”
In the previous module, one way by which we started to categorise our goals/learning objectives is by using Bloom’s Taxonomy. Wherein, the upper part of the taxonomy involved learning objectives that fell in the category “higher order thinking” while objectives that target the lower part of the taxonomy were those of “lower order thinking”.
# Higher order vs. Lower Order thinking Objectives
- According to Borich, one way we can distinguish these two broad categories of objectives is to say that"
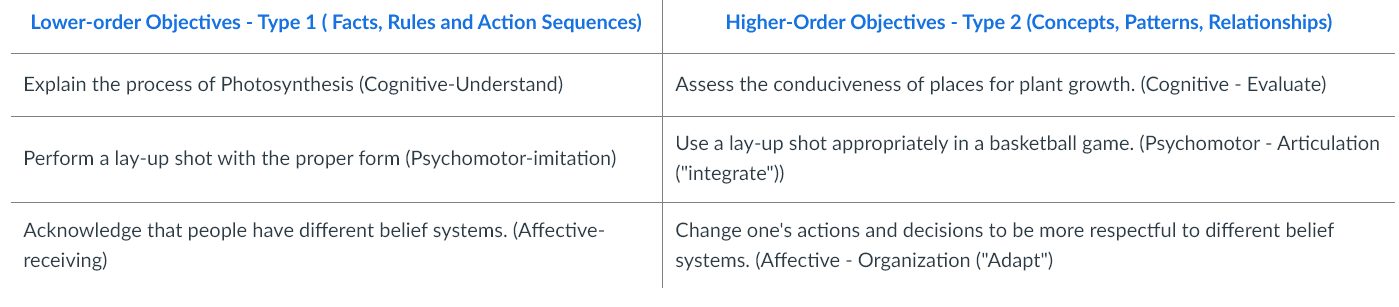
- what needs to be taught to meet lower order objectives (Understand and Remember) are often **"==facts, rules and action sequences== (or what Borich refers to as Type 1 tasks)"
- while what needs to be taught to meet higher order objectives (Apply, Create, Evaluate, Analyze) are "==concepts, patterns and relationships== (or what Borich refers to as Type 2 tasks) “.
- Let’s compare these two sets of learning objectives:
- Based on the examples above, what do you think makes Type 1 objectives different from Type 2 objectives?
- How do you think will teaching Type 1 objectives be different form Type 2 objectives?
# Answer
- Based on the examples above, what do you think makes Type 1 objectives different from Type 2 objectives?
What makes Type 2 objectives different from Type 1 objectives is that they’re attached to context. They’re not only asking for the demonstration of a skill (as seen in Type 1 objectives, which asks for isolated demonstrations), but they’re also asking for the application of this skill in a certain situation. In the examples provided, this can be seen in the following: using knowledge of photosynthesis in assessing places, using a lay-up shot in a basketball game, and using mindfulness of different belief systems to be a more respectful person.
- How do you think will teaching Type 1 objectives be different from Type 2 objectives?
I think that teaching Type 1 objectives is more teacher-centered, meaning that it requires that the teacher must first deliver the information. Meanwhile, teaching Type 2 objectives is more student-centered, meaning that it requires that the student must be able to fully process that information; in order to do this, they must be able of connecting the learnings to their own context.
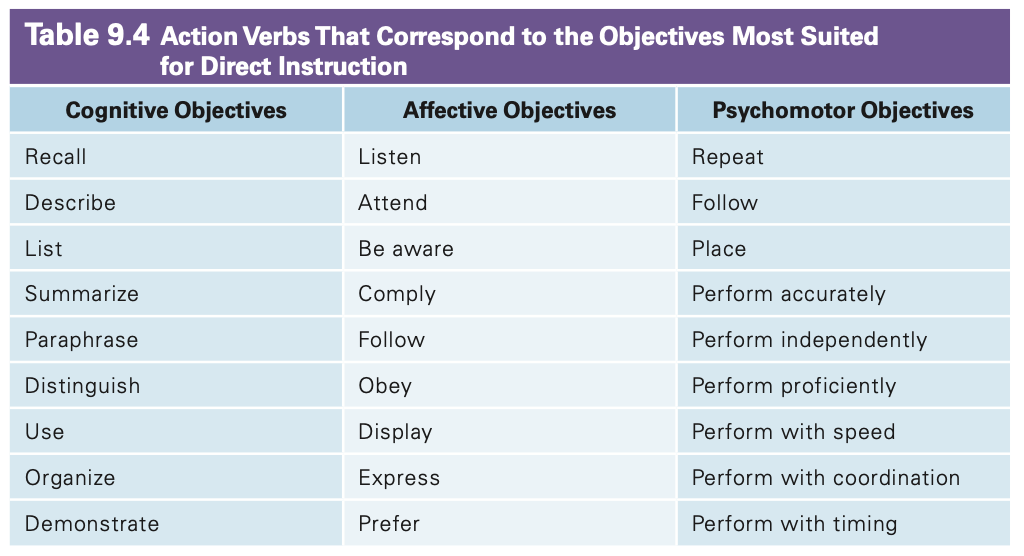
# Matching methods with objectives
What differentiates type 1 from type 2 objectives? What types of methods are more appropriate for each one? Let’s revisit the table from the previous activity.
- Type 1 objectives are often more “simple”
- By simple, we mean it involves less steps, less prior knowledge and experience, and less complex decisions or synthesis of ideas and skills. This means that they can efficiently be taught by ==“telling” or “showing”. ==
- For example, in the reverse engineer an activity we did in class, skills like “how to tie your shoelace” is a topic we can imagine easily telling students about or demonstrating to students. After all, for these types of objectives, the goal is for them to be able to repeat what you do or understand what you explain.
- The same goes for the sample type 1 objectives in the table above (Borich, 2017)
- Type 2 objectives are often more “open ended”
- Since there is often a greater level of analysis and decision making in type 2 objectives, there usually isn’t one clear cut “right answer”.
- For example, in the table above, using the appropriate type of shot may be different for one student or another, and greatly depends on the context of the game.
- Although you can teach students strategies like using a lay-up shot when they are close to the basket, and a jumpshot when they are far from the basket, etc., them actually being able to decide on when to take the shot and what shot to take is something they cannot learn just by hearing you tell them about it.
- In the same way, you can teach students grammatical rules, but them apply it accurately when explaining a concept of writing a narrative is something that is honed through practice.
- Teaching Type 2 objectives often ==entail providing opportunities for students to do problem solving.== (Borich, 2017)
# Key ideas about selecting instruction
- Focus on the learning first, then the teaching.
- A part of you might be thinking: “This is all great, but can’t we just go straight to the strategies?” - this is actually a common mistake of educators.
- Often, we get excited to think about the strategies and ways by which we want to teach our discipline (let’s gamify it! –but why?) without first thinking of how these activities will contribute to student learning.
- If we want to aim for learning to happen, ==we must begin with the learning first, before the teaching.==
- Use the right tool for the right purpose.
- As mentioned in the beginning of this module, the teaching methods you will learn next will be like tools in your teaching toolbox.
- However, you must know when and how to use the right tool for the right purpose.
- Using a wrench to fasten a screw might work but might not be the most efficient or effective way to do it.
# Direct Instruction
# What is Direct Instruction?
Teaching with Structure, Sequence and Scaffolding
- For type 1 objectives, one of the most efficient instructional methods is called Direct Instruction.
- Direct instruction, or what is sometimes referred to as explicit instruction, is a teacher-centered strategy in which the ==teacher is the main provider of information== (In light of our current context of online distance learning, “teacher” here can be replaced with software/module or LMS-more than the persona teaching, it’s how students are learning in this method that differentiates it from others - where this is a more “direct” approach).
- Since the goal of type 1 objectives is for ==learners to be able to do or know what a teacher is currently be able to do or understand==, then a ==direct instruction approach is often most efficient.== This module page is an example of direct instruction, since as you read through this text and watch the media I ask you to, the intention is to help you describe what direct instruction is for yourself.
- One of the most common experiences we’ve probably had of this method, as a learner, is the ==lecture or teacher presentation==, but what is it that goes on in planning for this method that can make it an effective teaching method? One way to characterize this method is to refer to 3 key words: Structure, Sequence and Scaffolding. Let’s unpack each of these characteristics.
# 🖼️ Structure
- One of the key principles in using direct instruction is that it ==presumes a structured set of activities and presentation of the lesson.== The way a lesson presentation is structured in direct instruction allows several students to follow in a lesson, whether it be a straight lecture or a set of activities guided by the teacher.
- This is probably why this approach is one of the most common methods used - since the ==ratio of teacher to students in most classrooms is probably 1:15== (teacher:student) and above. Another context that has kept this as one of the most adopted methods is time - that in a lot of formal teaching scenarios, ==teachers have to work with a limited contact time with their students== (Even in online learning, we can only assume that you will spend N number of hours on a module).
- In the direct instruction model, facts, rules, and action sequences are presented to students in the most direct way possible. At first, this usually takes a ==presentation and recitation format with explanations, examples, and opportunities for practice and feedback provided by the teacher.==
- Watch this short video to see what a typical direct instruction structure looks like
# 🖼️ Structure
- The video above presented a sample structure that is common to direct instruction. If you do a quick search about direct instruction lesson plans, you might feel a little overwhelmed with the variety of different ways they look like.
- However, there are a few key common parts, despite them being called differently. For the purpose of our course, we will follow this simplified structure:
- PREPARE
- In this first part of the direct instruction method, you will need to prepare students to take in the new information you want them to learn. I chose the word “prepare” because I think that this presupposes that more often than not, in a formal education setting, a curriculum is already set for students (It’s not as if every subject they take is an elective).
- Therefore, it is important to begin by ==establishing relevance==, to hopefully motivate learners to take on the new information to be presented. Typically, there are 2 things that you would like to be able to do here:
- Inform the learners of the learning objectives.
- State your objectives in a clear and understandable fashion. If you are in a physical classroom, it is often good practice to ==write down your objectives and keep them visible== on a board so you can refer back to it.
- The challenge here is that ==sometimes younger learners have different levels of reading comprehension== - one interesting strategy I saw done in the early grades is that for some teachers, they actually ask students to rewrite the learning objectives in their own words.
- Activate prior knowledge and/or experience.
- In part 1, we called this “Activate from Context”. Here, you can ==refer to a students’ related prior knowledge/experience about the topic. ==
- For example, before introducing the concept of photosynthesis, you might ask students to draw plants, or in a Philosophy of Religion Class, an instructor might simply ask “What do you think is religion?”. Apart from the cognitive advantages of activating from context, this also allows you as a teacher to get a ==“read of the room” or to understand where your students are at the moment== - what do you they already know/what are their misconceptions at this point, etc.
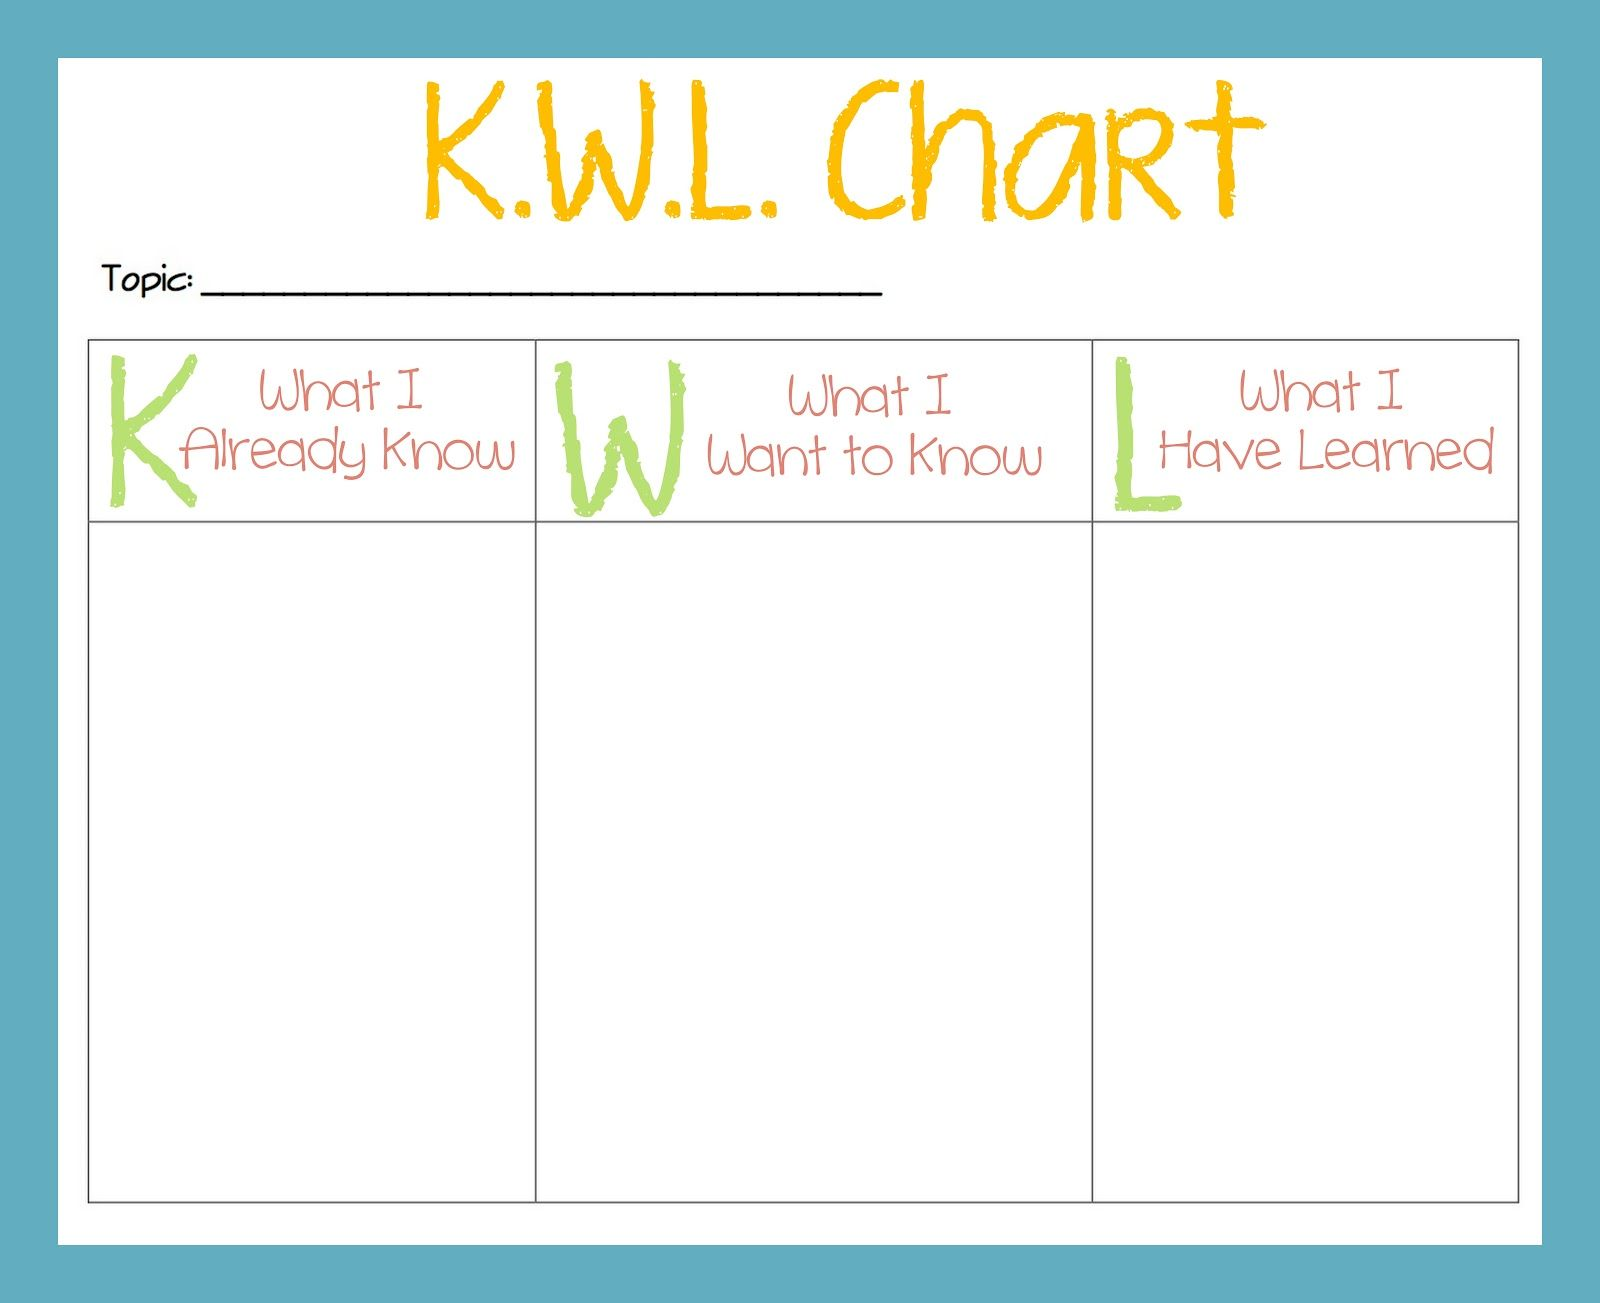
- One common strategy, most specially in basic education is ==the use of a KWL chart==, where students fill in the blanks for K and W in the beginning of a lesson. Sometimes, in the preparation stage, teachers also try to gain students’ attention through presenting something from pop culture (something that students have previously encountered).
- Inform the learners of the learning objectives.
PRESENT AND PROCESS
- The next phase is the “meat” of the lesson, wherein ==teachers present stimulus material and where new knowledge or skills are introduced.== This comes in many forms, the most common being a presentation/demonstration.
- The short video lectures i’ve posted in the course, and this text you are reading now are examples of this phase. Here, the instructional intention is for you to hopefully not just understand the information presented, but also process it.
- A common critique of the direct instruction method is the way this phase is implemented by educators - for example, if you recall teachers who might have “powerpointed you to death” (who just stood in front reading from slides), this is representative of the common critique against direct instruction - ==the lack of involvement of the students== (Remember how we established in the previous module that learning is actually an active process).
- For direct instruction to be effective though teachers should not just dominate the presentation - but should ==ideally involve the students in the knowledge building process.== So, how do we make sure that you do this effectively? Here are some tips:
- Chunk your content
- HOW MUCH LEARNING TIME:
- In Brain Rules, Author John Medina reminds us that ==our brains naturally look for something else to do every 10 minutes!== This means that when you hit the 10 minute mark, the temptation to lose focus becomes very real for students!
- One way to address this is to ==stop giving new information/demonstrating new skills after the 10 minute mark== - what often helps is to ==insert a discussion or short practice activity==, or even just an ==open forum== for students to discuss what they have gained from the past 10 minutes. (note: this is the reason why in the modules of this course, i’ve broken the topics down into several pages and discussion forums, rather than one very long one).
- HOW MUCH TO BE LEARNED AT A TIME:
- Have you noticed how most effective speakers would say something like, “there are three things about ___?”.
- There is actually some science behind this! According to Dr. Barbara Oakley, ==our brain’s working memory has the capacity to take on 4 new things at a time.== This means that if you are introducing something entirely new to your learners, already keep in mind that after the 4th new concept, your learners may need a break, or time to process.
- The operative word here is “new” - ==the more prior knowledge you have about something, the less it will feel “new” to you== (and consequently, will cause less of a cognitive load to process).
- Remember our earlier discussion about student diversity and how your students’ socio-economic status might get in the way? Imagine how different it would be to teach students Science if you have a student who has never been to a museum vs. those who have.
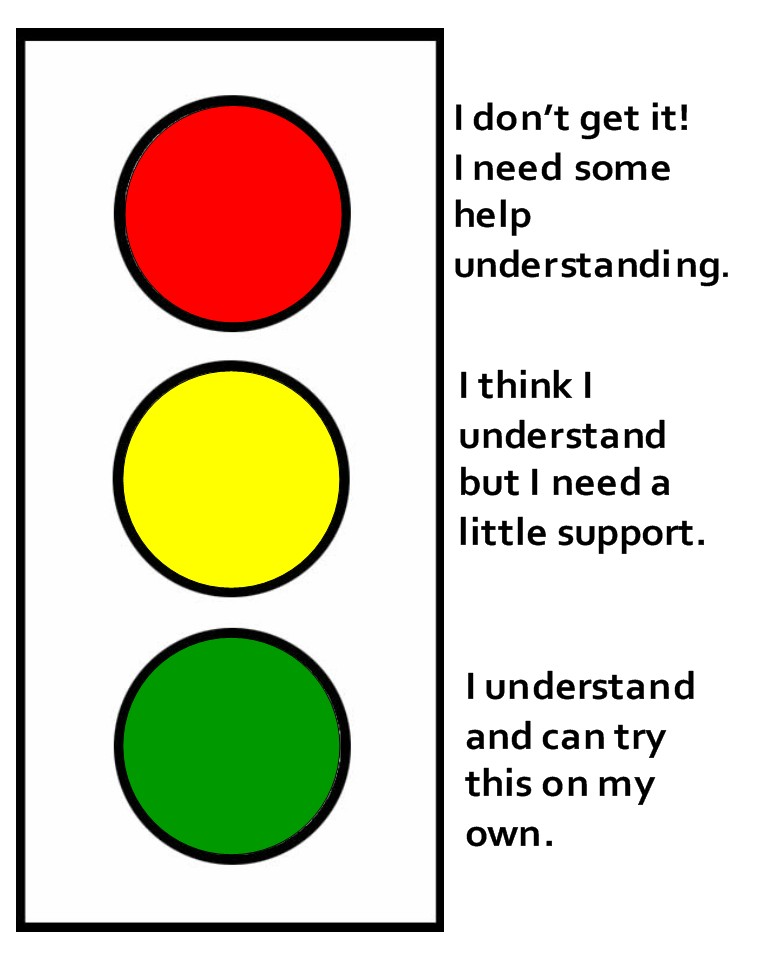
- Sometimes the pause you insert in between “inputs” can be a simple “temperature check”. A common way this is done is for teachers to ask students to bring three pieces of paper (red, yellow and green), and occasionally, students will be asked to raise a colored sheet of paper depending on how they are doing (Trivia: in zoom, the go faster and slow down prompts which participants can click serves as a good substitute of this).
- HOW MUCH LEARNING TIME:
- Scaffolding
- Another common educational term that can help you plan the present and process phase is the term “scaffolding”. You might have previously learned about this in your Psych 101 class, but scaffolding, as it also appropriately refers to ==the multi-stage structure often used in construction, presupposed that knowledge and skills actually build on each other. ==
- Recognizing this, one helpful thinking tool is to think about how your target knowledge/skills could be broken down (remember our reverse engineering activity?).
- A common strategy for scaffolding is the I do, we do, you do method (although it is often used in elementary education, I think it can easily be translated to teaching older learners). Here’s a brief demonstration of this strategy. In this example, a graphic organizer was used to help scaffold the learning process - ==graphic organizers and worksheets are helpful tools for scaffolding.== The KWL chart above can serve the same purpose.
- No matter how you present content, a good guiding principle is always to go back to the instructional intention which is for your learners to ==“connect to content”, not just to absorb content.== This way, you will always be thinking of how you can make sure that the learning experience is not a passive but an active one.
- Chunk your content
PRACTICE
- Finally, the third phase is when you “evaluate to validate”. This is the “you do” part of the lesson, where ==a teacher often gives exercises for students to work on or questions to reflect on and discuss. ==
- The goal here is two fold: for ==“retrieval practice” ==to happen (which we know contributes cognitively), and for teachers to ==receive feedback on student learning== (after all, this is the goal, according to Hirst).
- Some critiques of this approach would often say that there is often no time left to do this in a class period. Because of this, strategies such as asking students to work on an “exit ticket” has been developed. These are short, quick exercises that students can do towards the end of a session. Here’s a brief demonstration about exit tickets.
# Teaching Challenge: Direct Instruction
Here’s a design challenge for you. Identify a type 1 objective for the lesson you are planning. Then, think about how you can use direct instruction to teach it. In your post below include the following:
1.) Identify the year level and topic (ex. Grade 9: Introduction to Algebra) 2.) Identify One (1) Type 1 objective (ex. Students should be able to define accurately what a variable is.) 3.) Propose a set of instructional activities for a 60 minute face to face class period using the Direct Instruction Method. Complete the three phases (Prepare, Present and Process, Practice). For each activity, also provide the estimated time.
# Answer
Year Level and Topic: Cultural Studies of Contemporary Technology for 4th Year College students
Type 1 Objective: Utilizing critical theory, students should be able to analyze contemporary technologies.
Direct Instruction Example:
- PREPARE
- Present the learning objectives for the session.
- Learn critical theory
- Apply this to technology
- Prior knowledge
- Present the learning objectives for the session.
- PRESENT AND PROCESS
- Instructional Procedures
- Marxism
- Structuralism
- PRACTICE
- Student activity
# Key ideas about Direct Instruction
- The effectivity of Direct Instruction depends on structure, sequence and scaffolding.
- The 3 S-es that serve as the characteristics of Direct Instruction serve as its key ingredients, if it is to be used effectively.
- Direct Instruction is a science and an art.
- A common misconception of Direct Instruction is that it is rigid in structure and highly prescriptive.
- Although here in the module you were taught a structure to follow if you were to employ direct instruction, what you do within the 3 Ps (Prepare, Present and Process, Practice) still greatly depends on you! ==Your creativity (the activities you come up with) and your empathy (how much you understand the context of your students) are key ingredients to Direct Instruction success. ==
- For example, in the present and process part, you can insert some collaborative activities where students can play a more active role. Although we are encouraged to refer to what research has uncovered about good teaching and effective learning, making adjustments and contextualizing to your students is still of utmost importance.